The photograph below is the old color. You can see is a dark brown with gray accents. I have a lot of makeup on in this picture. I know it doesn't look like I have any on. The bottom picture is the new hair color. I have no makeup on in that picture because I am a low maintenance woman. I like the look with the lighter hair. I think it makes my face brighten up. Would you change your hair color?
Friday, September 11, 2015
Saturday, September 5, 2015
There is progress on the Chanel Jacket
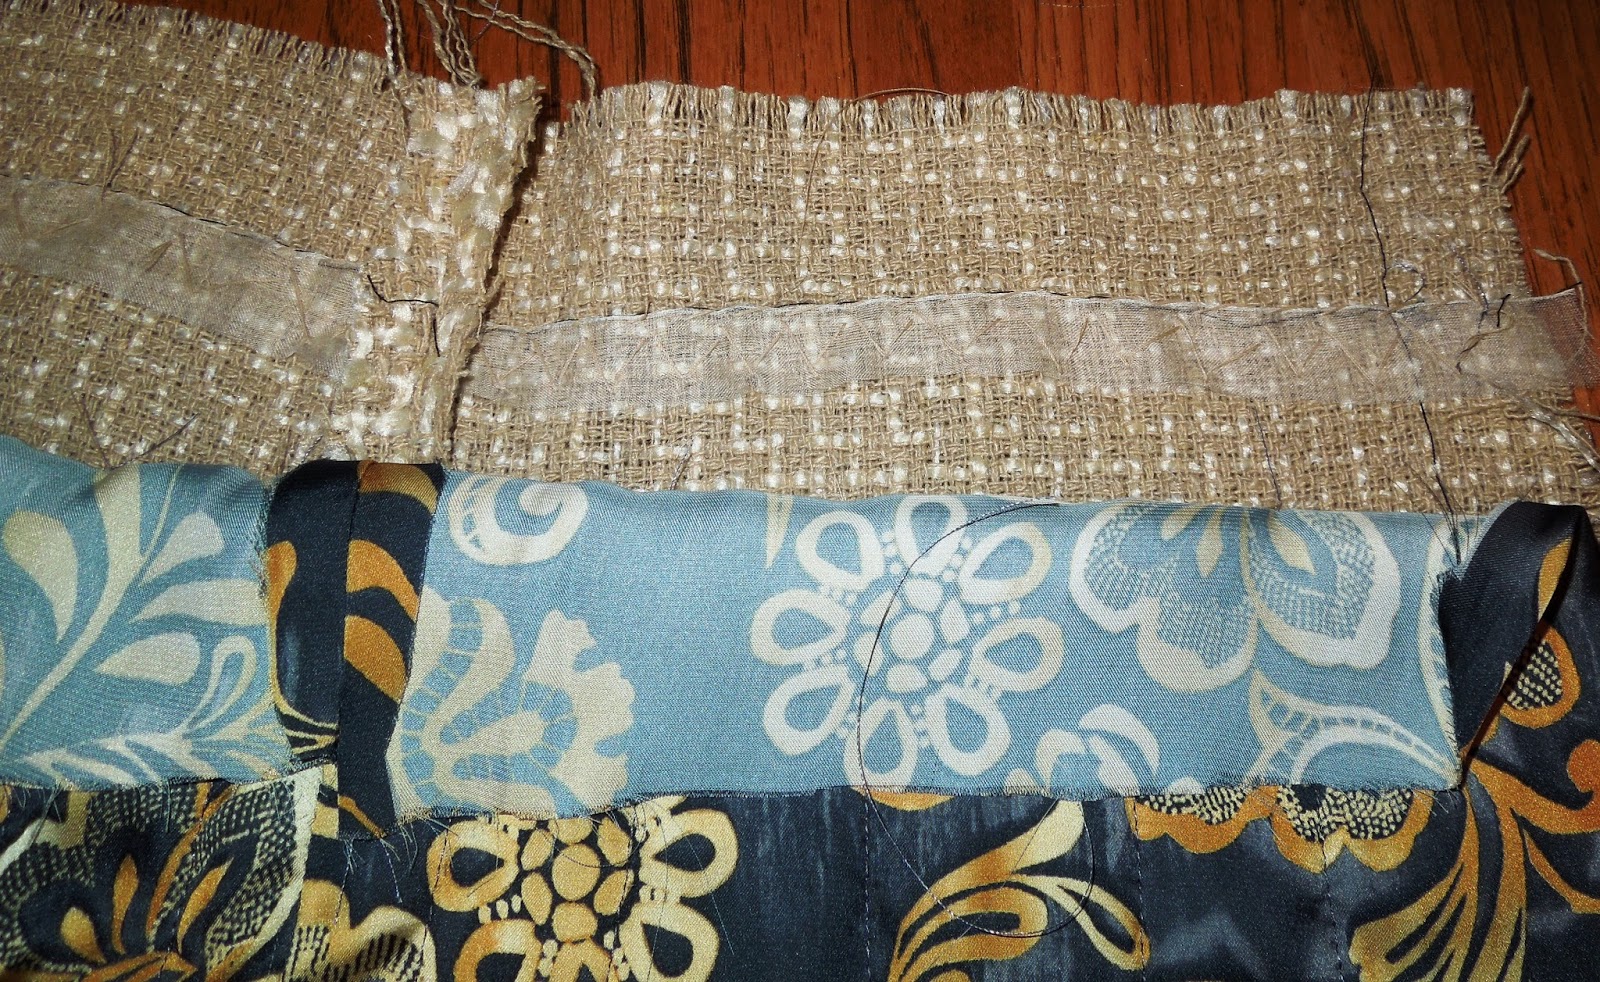
I have made progress on the Chanel Jacket. I have it all sewn together the chain is stitched onto the hem. I am now painstakingly
sewing the ribbon trim and then the braid on top.You can see the navy ribbon peaking out on the sides of the trim. This is to make the braid pop. The buttonholes will be added after the trim is place on the jacket. The jacket has been a labor of love but I will be making another one with better fabric the next go around.
I wanted to mention Craftsy because that is the online sewing service I have been using to guide me through this jacket. The class is called the Iconic Tweed Jacket. I do recommend this class it is well presented and the video are great because you can watch them repeatedly if needed.
So my blogger friends that sew what are you working on?
Here are some examples of real Chanel jackets that I found on line.


The one on the right uses the rough edges as a trim

Hope you enjoyed looking at the real deal.
sewing the ribbon trim and then the braid on top.You can see the navy ribbon peaking out on the sides of the trim. This is to make the braid pop. The buttonholes will be added after the trim is place on the jacket. The jacket has been a labor of love but I will be making another one with better fabric the next go around.
So my blogger friends that sew what are you working on?
Here are some examples of real Chanel jackets that I found on line.


The one on the right uses the rough edges as a trim

Hope you enjoyed looking at the real deal.
Sunday, August 23, 2015
Chanel Jacket update
I have the pieces cut out of the main fabric and lining and I have them all quilted together. There has been a flurry of hand stitching of supporting tape along the edges and hems and down the front both sides. Next step is to machine sew the seams then hand sew the lining and edges. That will be another long process. It is coming along. I have to finish by October.... this year.
![]() |
| right side |
![]() |
| quilted sleeve lining |
![]() |
| right side of two piece sleeve |
Can a boyish haircut on a sixty year old still be feminine?
What is feminine on a sixty year old? Can a pixie or boyish haircut still look feminine on a sixty year old? The juxta position of masculine haircut on a cute younger woman works. Hence the popularity of the pixie haircut on many movie starlets in recent years. But can a 60 year old rock the look?
One of the things I have noticed is that the younger set wears a lot of eye makeup with the look. The other thing I noticed is that they also wear high heels and dresses with the look. The trendier pixie cut wearers also seem to sport tattoos with the look. I am not a fan of tattoos on me and I don't wear high heels anymore nor do I wear eye makeup anymore. I am wondering if this will still work on me?
![]() |
| undercut pixie |
![]() |
| curly pixie |
![]() |
| mature woman pixie I love this one on her |
![]() |
| Another pixie variation |
| a lighter color as well |
Labels:
feminine,
sporty-lux,
Undercut pixie haircut,
You look fab
Tuesday, July 7, 2015
Channel Jacket project Part II-selecting the lining and trims
Lining of the jacket:
I didn't just want to make a neutral beige jacket with an ivory lining. I wanted to punch it up with a bold print lining.
Trimming the jacket:
I picked out a trim that has the color of the main fabric as well as the color in the lining print. There are many trim options for this type of jacket. the most commons is to attach a braid to the outer coat along the neckline hemline and cuffs. It is traditional Channel to have trim along the edges of the patch pockets as well. Here is the trim that I layered over a Petersham base. I think the Petersham needs to be narrower and perhaps a blue would be nice.
I didn't just want to make a neutral beige jacket with an ivory lining. I wanted to punch it up with a bold print lining.
| neutral creme lining |
Trimming the jacket:
I picked out a trim that has the color of the main fabric as well as the color in the lining print. There are many trim options for this type of jacket. the most commons is to attach a braid to the outer coat along the neckline hemline and cuffs. It is traditional Channel to have trim along the edges of the patch pockets as well. Here is the trim that I layered over a Petersham base. I think the Petersham needs to be narrower and perhaps a blue would be nice.
![]() |
| example of pocket trim |
Friday, July 3, 2015
Channel Jacket Project--- very long post warning!
About a year ago I decided I wanted a Tweed Boucle Channel style jacket and started to think about how to accomplish this project. Clarie Shaffer has a whole book dedicated to this couture made jacket. At that time I became aware of Craftsy classes on line. I took advantage of a holiday sale and got two of them on sale; The Iconic Tweed Jacket and Jacket Fitting Techniques. One was on pattern fitting for jackets and the other was making a cardigan jacket -Channel jacket. I decided to use the Vogue Pattern that the Craftsy class uses Vogue 7975. Mine will be view E a longer jacket with buttons.
There are many patterns out there with this cardigan jacket in mind here are a few that I found a while back. Some have some very couture details and some are much simpler. I am not a couture sewer but can do some of the techniques.
Whenever I take on a big project I want to do it correctly and I don't worry how long it will take me to finish the project.
Before I sew anything I make a test garment called a muslin some people call it a toile. In order to do this you must cut the tissue pattern out of fabric and sew it together discover how your body differs than the pattern make the adjustments and cut a new toile until you get a great fit. It is difficult to do this on yourself and very time consuming. I decided to use my dress form and duck tape. Yes you can duck tape yourself and create a shell that can then be placed on a dress form and with a bit of stuffing voila you have an exact replica of your body. This took time for the class to come and for the form to be finished but I did get a good fit using this method. I also bought the fitting series DVD by Kenneth D. King called Smart Fitting. It is a interesting CD but not for beginners.
I had bought my fabric a few years ago when it was on sale and I got another recently on sale. Both are synthetics and cheaper than the Linton tweeds that is popular for this jacket.
After all of this time which is six months ago I finally have my fabric and lining cut out. I am making a version with buttons and trim that goes around the neckline down the front and along the hemline. the edge of the sleeves with have it too. I am making a two piece sleeve but without the button vent. I decided that I didnt want that much fussiness in my first jacket.
The trim ideas are many and I have so many ideas but think I have setting on an easy but nice version.
Here are the pictures of my pieces cut out.
Have you ever done a project that took much time to plan and execute. I love the process so I don't mind the length of time to complete this project. Tomorrow I will post about my trim options.
![]() |
| Vogue 7975 /view E |
There are many patterns out there with this cardigan jacket in mind here are a few that I found a while back. Some have some very couture details and some are much simpler. I am not a couture sewer but can do some of the techniques.
Whenever I take on a big project I want to do it correctly and I don't worry how long it will take me to finish the project.
| Some fitting issues I needed to fix |
| during the fitting process |
I had bought my fabric a few years ago when it was on sale and I got another recently on sale. Both are synthetics and cheaper than the Linton tweeds that is popular for this jacket.
After all of this time which is six months ago I finally have my fabric and lining cut out. I am making a version with buttons and trim that goes around the neckline down the front and along the hemline. the edge of the sleeves with have it too. I am making a two piece sleeve but without the button vent. I decided that I didnt want that much fussiness in my first jacket.
The trim ideas are many and I have so many ideas but think I have setting on an easy but nice version.
| I am using the wrong nubby side as my right side |
Have you ever done a project that took much time to plan and execute. I love the process so I don't mind the length of time to complete this project. Tomorrow I will post about my trim options.
Wednesday, February 4, 2015
The arty vest is done
Applique, Quilting and bias binding are a few of the features of my new vest. This project was inspired by a embroidery CD I bought last spring by Floriani . Leaves of Nature it is called and it called out to me. I had no idea what I would use it for when I bought it.
Then I was in Indiana at a quilting store and I found this quilted fabric with leaves stamped on it. Eureka! I saw a marriage between the two. The next day I went to a fabric sale run by the Mennonite people in Indiana and I found 6 yards of a calico cotton that would compliment my leaf fabric. I got to planning and now many months later I have finally finished the vest. I used pattern Butterick 6062 for the vest, View D which has patch pockets and a dart and the hem is rounded.
I used my duct tape double to fit this pattern and it came out just right. It was the first time I ever used her since I made her last April. I do recommend having one if you don't already.
I plan to make a jacket that will compliment the jacket. I have used the same fabrics but will reverse the usage of the quilted with the calico. The jacket will have more embroidery on it possibly a boarder of leaves. I just wanted to have fun with some of the techniques I have been exploring in my monthly sewing guild meetings. What have you been working on lately?
Then I was in Indiana at a quilting store and I found this quilted fabric with leaves stamped on it. Eureka! I saw a marriage between the two. The next day I went to a fabric sale run by the Mennonite people in Indiana and I found 6 yards of a calico cotton that would compliment my leaf fabric. I got to planning and now many months later I have finally finished the vest. I used pattern Butterick 6062 for the vest, View D which has patch pockets and a dart and the hem is rounded.
| additional fabric calico |
![]() |
| Butterick 6062 |
I plan to make a jacket that will compliment the jacket. I have used the same fabrics but will reverse the usage of the quilted with the calico. The jacket will have more embroidery on it possibly a boarder of leaves. I just wanted to have fun with some of the techniques I have been exploring in my monthly sewing guild meetings. What have you been working on lately?
Subscribe to:
Posts (Atom)