Saturday, December 27, 2014
Plans for a New Year:Where to go with this Blog?
Have you noticed lately that bloggers are getting much less feedback than lets say two years ago? I have noticed this. I still read all of my favorites and a few more that I am always discovering. Is blogging loosing popularity to twitter? I don't really have the answer for you but I am still blogging. My blog does not raise money for me nor is a career stepping stone, rather it is a public documentation of my hobbies and interests. I like the fact that others can randomly read it and respond to it. That is the purpose in a nutshell. I don't need to be famous or popular or necessarily right about anything just feel the need every once in a while to put my thoughts on my blog. So in the upcoming year I will continue with my hats and sewing as my most frequent posts. I am going to post some updated pictures of what I am wearing as well. I think my style is evolving but to what I am not sure. I just purchased the color theorist's book,"Color Your Style, A Fashion Expert Helps you to pick your colors etc, by David Zyla. He has an interesting way of picking out colors based on the ones found in you skin and eye colors. I think I like this in principle. I have been draped but not always able to find those specific colors. Am continuing to work on my two piece jacket my Chanel inspired boucle wool jacket and a few other unfinished pieces. I am having so much more success with my embroidery machines. Oh and for Christmas I bought a Janome 8900 quilting and sewing machine. I will let you know about it but so far it is amazing. Have a great 2015 my friends!!
Thursday, December 4, 2014
Is black the only color for a funeral?
I am going to a memorial service to honor my mother tomorrow. She passed away in September and has lived a long life. One of the things she enjoyed was for me to help her put together her 'outfits' and to pick out her jewelery to go with the outfits. This process has been going on for a long time.
I do remember once in 1966 helping her get ready for a date with my dad. We spent hours getting the makeup on and the wig combed and teased. I put on those old fake nails that you glued on for her. Her shoes had 3 inch heels and were gold and sparkly. It took me at least 10 minutes to hook up her long line girdle-bra combination because she could not reach them on her side.
Once she was all glammed up and walked down stairs my dad looked at her as she descended and pronounced,"Where is my wife who are you?" . No she didn't kill him but it was not the reaction she was hoping for.
I learned from that event to dress my truth and not to transform myself into something I wasn't.
Tomorrow we are having a service to honor her so I decided to glam up for it just for her. So I bought a new dress with some stones sewn to the neckline. I normally wouldn't go for the sparkly but my mom would have loved it so I 'll wear it in her honor. Normally people would wear all black to a funeral. I gave up wearing black several years ago because I just don't look good in black. It makes me look washed out. So I hope nobody in my family will be offended but I am not going in all black. In fact I will be wearing a blue coat. Is there really a dress code for funerals?
 |
| Jerry 2012 |
Sunday, November 9, 2014
Two piece jacket vest combo
I am starting a new jacket project. I bought a quilted leaf print fabric.
 It is reversible so here is the other side.

There is something about leaf prints that attracts me.
There are a few patterns that were specifically developed for this kind of pre quilted fabric.
Butterick Pattern 5400 is one of them. I decided that I didn't want such a simple jacket, yes, the fabric is busy already but I wanted to kick it up a notch.


 I decided I needed a complimentary non quilted fabric so here is what I chose. A printed cotton calico.
 I believe this will make for a nice contrast in that it is a different scale print and also it is one of the colors in the leaf print.
The other issue with the Butterick pattern was that is had a poor fit in the shoulder and bust for me. I found Butterick 6062 view C. It has a built in bust adjustment for D cup and a really nice vertical dart.

 Now to the gist of this post mixing it up or transforming a piece of fabric into something fabulous. I am going to make two pieces that work together. A jacket and a vest that can be worn alone or together layered. One piece will be the jacket with the back from the quilted fabric and the front from the calico fabric. The vest will be the made with the front from the quilted fabric and the back from the calico. The sleeves of the jacket are two pieces so the larger one is quilted and the under sleeve is the calico.
 I am going to admit it is not my original idea. This is a poor picture of page 229 form Oct 2012 INStyle magazine. I loved the idea of these two pieces working together or alone. So that was my inspiration. Stayed tuned as I will be doing a follow up post on the embellishment details I have planned.
I am linking up with Not Dead Yet Style
There is something about leaf prints that attracts me.
There are a few patterns that were specifically developed for this kind of pre quilted fabric.
Butterick Pattern 5400 is one of them. I decided that I didn't want such a simple jacket, yes, the fabric is busy already but I wanted to kick it up a notch.
The other issue with the Butterick pattern was that is had a poor fit in the shoulder and bust for me. I found Butterick 6062 view C. It has a built in bust adjustment for D cup and a really nice vertical dart.
I am linking up with Not Dead Yet Style
Thursday, October 16, 2014
Georgia O'keefe influencing my designs


The last painting shows beautiful adobe colored hills with yellow leaves with a hint of green. I like how fluffy the leaves look almost could be flowers. Well I have an adobe colored panama straw I think I will try yellow fluffy flowers to mimic the same effect here.
Just some of my new inspirations cooking in my head for next year.
Saturday, October 11, 2014
Hatmaking many methods
I have been making hats for about 12 years now and many people want to learn the art of hat making. That encompasses many different techniques and different equipment and materials. Here is my best attempt to explain all of this. I consider myself a milliner. Webster's definition is : a person who designs, makes, or sells women's hats. That is a very broad definition but correct. The method I like to use is to shape pre woven straw hat blanks with wooden hat blocks that have two parts. The crown and the brim. I will usually dye the straw and add a gelatin stiffener before I block my hats. I can also use pre felted hat blanks that are made up of wool or rabbit fur.
The way I get the the hat blanks to take the shape of the wood is to wet them and for the wool ones I use steam. Once the hats have dried I then can finish them so they maintain the shape. This usually means adding a wire to the edge of the hat and or a binding over the wire or to just leave the edge unfinished. Sometimes the crown and brim have to be sewn together if they were made from two pieces. I then finish the head band inside of the hat which will serve to maintain the headsize.
Next onto the fun part which is making up a trim that goes on the outside of the hat.
Another commonly used method of hat making is to use fabric in yardage the preferred choice to this method is Sinemay which is woven out of banana leaf fibers. Again the yardage is dyed and sometimes stiffened. Using a crown and brim block the hat parts are made and assembled. This is a more difficult and time consuming process because you are using 3 layers at once to fit over the hat blocks to give the required thickness so it will hold the shape.
A third method is to use a buckram foundation shape that is covered with fabric utilizing the bias of the fabric to stretch over the shape with out excessive puckering and wrinkles. Many fascinators are made this way as are cocktail hats.
Then there is another whole different technique using sewn braid straw. This product is bought in sufficient quantity in order to sew out a crown and brim. It utilizes a sewing machine and the technique roughly is to start with a little coiled center and to sew round and round which grows out of the center until the crown is sewn then with a slight manipulation the brim is added sewing round and round adding width to the brim as you go. This is a very different technique from the blocking method. Sometimes after the braid is sewn the hat is blocked as well. There are different types of braids as well some are natural milan straw for example and others are synthetic as in the case of horsehair braid. There are many hats made with ribbon this way.
The last type of hat making I will mention is flat pattern sewn hats. These are made out of a huge variety of types of fabrics, leathers, suede, wool. The pattern pieces are cut out and sewn and usually a lining is cut and sewn as well the crown is stiffened by using interfacing or plastic canvas inserts.
So when you express a desire to learn how to make hats think about which method suits your fancy. Each method has its own unique equipment and techniques. Some of the vintage hats that were made in the past were made out of materials that are no longer available. On the flip side there are new materials that are being used such as fossshape.
Friday, August 15, 2014
Once in a while.......

I have so much make-up on in this picture but it looks like I have a little. Just goes to show you how much photography drowns out the make-up. I also took my glasses off because of the glare they cause. I am not great with photo editing so excuse the white dot in the pupils.


 |
| ignore the pink sports bra please eeekkkk |

Sunday, June 29, 2014
On a whim off with the @hair!!!!!
Sometimes coming up with a new look is an evolutionary process. I went on such a trip over the past three years. Feeling a bit bored with my hairstyle and not knowing where to go with it I decided to grow my hair out. It took me three years and many hairdos and I grew it out. When I got there I played with the color and the texture and decided I didn't really like it after all and I am a short haired girl at heart. Here is a photographic trip of my hair style evolutions.


I have noticed that face has gotten fuller over time and that to balance it I really need the volume to be on top above my eyebrows. I do like the brown/grey mix of my hair which you cannot see in this picture. I am much happier with my sporty chic haircut. I almost did the Mohawk look but the nice lady at the haircut place said,"I think you wont be happy with that look." Today I am glad I didn't go there. My next chore will be to grow out to my natural level of grayness. I am a lot grayer than you think stay tuned for pictures at that evolves.
 |
| Start Fall of 2012 |
 |
| yesterday June 28, 2014 |
 |
| too much sun for my eyes but you can see the color better |
Friday, May 30, 2014
Project Runway inspired wardrobe two new pieces finished!!!
I have completed four tops and three bottoms. None are stellar but each has taught me something about fitting and embellishments. I am also getting a better idea of what will work with my body type.
Here is my gingham blouse with embellishments and my linen skirt with embellishments.

 |
| used my circle foot attachment to sew these |


I made the view of the skirt with the curved hem. I added top-stitching and an embroidery design to the skirt on the bottom. I wanted to keep it very casual like the top. I was just trying out this pattern and wanting to add embellishment since I have learning a lot about machine embroidery for the past year. I am learning how to fit items better since I got a 'body double'.
I recommend doing the same if you want fitting to be so much easier. I am realizing that I pick out the wrong styles for my height and body build. I love loose wide tops but that isn't the most flattering look on me. I need more width at the bottom of an outfit. I am still sewing out of my stash. No fabrics purchases until I have depleted it. That still may take some time but I have two new dresses cut out. One is actually going to be a bathing suit cover up. The other is more dressy.


 |
| hem detail and embroidery design |
 |
| skirt and top together |
Sunday, May 18, 2014
Millinery ABHats 2014 hats and trims
It has taken me about 2 years to learn how to do machine embroidery. I wanted to learn it so I could utilize it in making trims for my millinery business. Here are some examples now that I finally have a machine that works well and I know how to do it.

 The purple ribbon was made with a rolled edge setting on my Baby lock Serger.

 These flowers were stitched out onto shimmery organza with an outline stitch. I added the purl centers. the hat is a blush color which the flash washed out a bit in the picture.
 This hat has millinery grade flower which I did not make but will soon be making some and posting those pictures as well. Enjoy. I'm headed over to Not Dead Yet Style Blog to see what everyone else has been up to.
Thursday, March 27, 2014
The birth of a new hat
I am making a hat for someone to wear at a horse race in Dubai, Saudi Arabia. We talked about the style she wanted and looked at the dress she would be wearing and her accessories. We came up with a color that is sort of a neutral luggage tan/brown. The color was complimentary to peacock feathers and her dress. So here are a few shots of the beginning of the blocking process. I have dyed the sinemay prior to draping and blocking it on the hatblocks.
The dress will be worn with an emerald green sheath dress.
 |
| Brim block with sinemay draped over it |
 | ||||
| crown block with the ribbon I was to match | The brim and crown actually are the same color but the camera made the brim look lighter. Tomorrow stiffner will be applied. Drying time is needed in between these steps. |
 |
| The edge has been wired and a bias binding sewn on over it. |
 | |
| here the brim is ready for the crown to be attached. I added a collar from buckram for support. A Petersham head band will be sewn on as well. The blue tape marks center back. |
 |
| hat with hat band before sewn on |
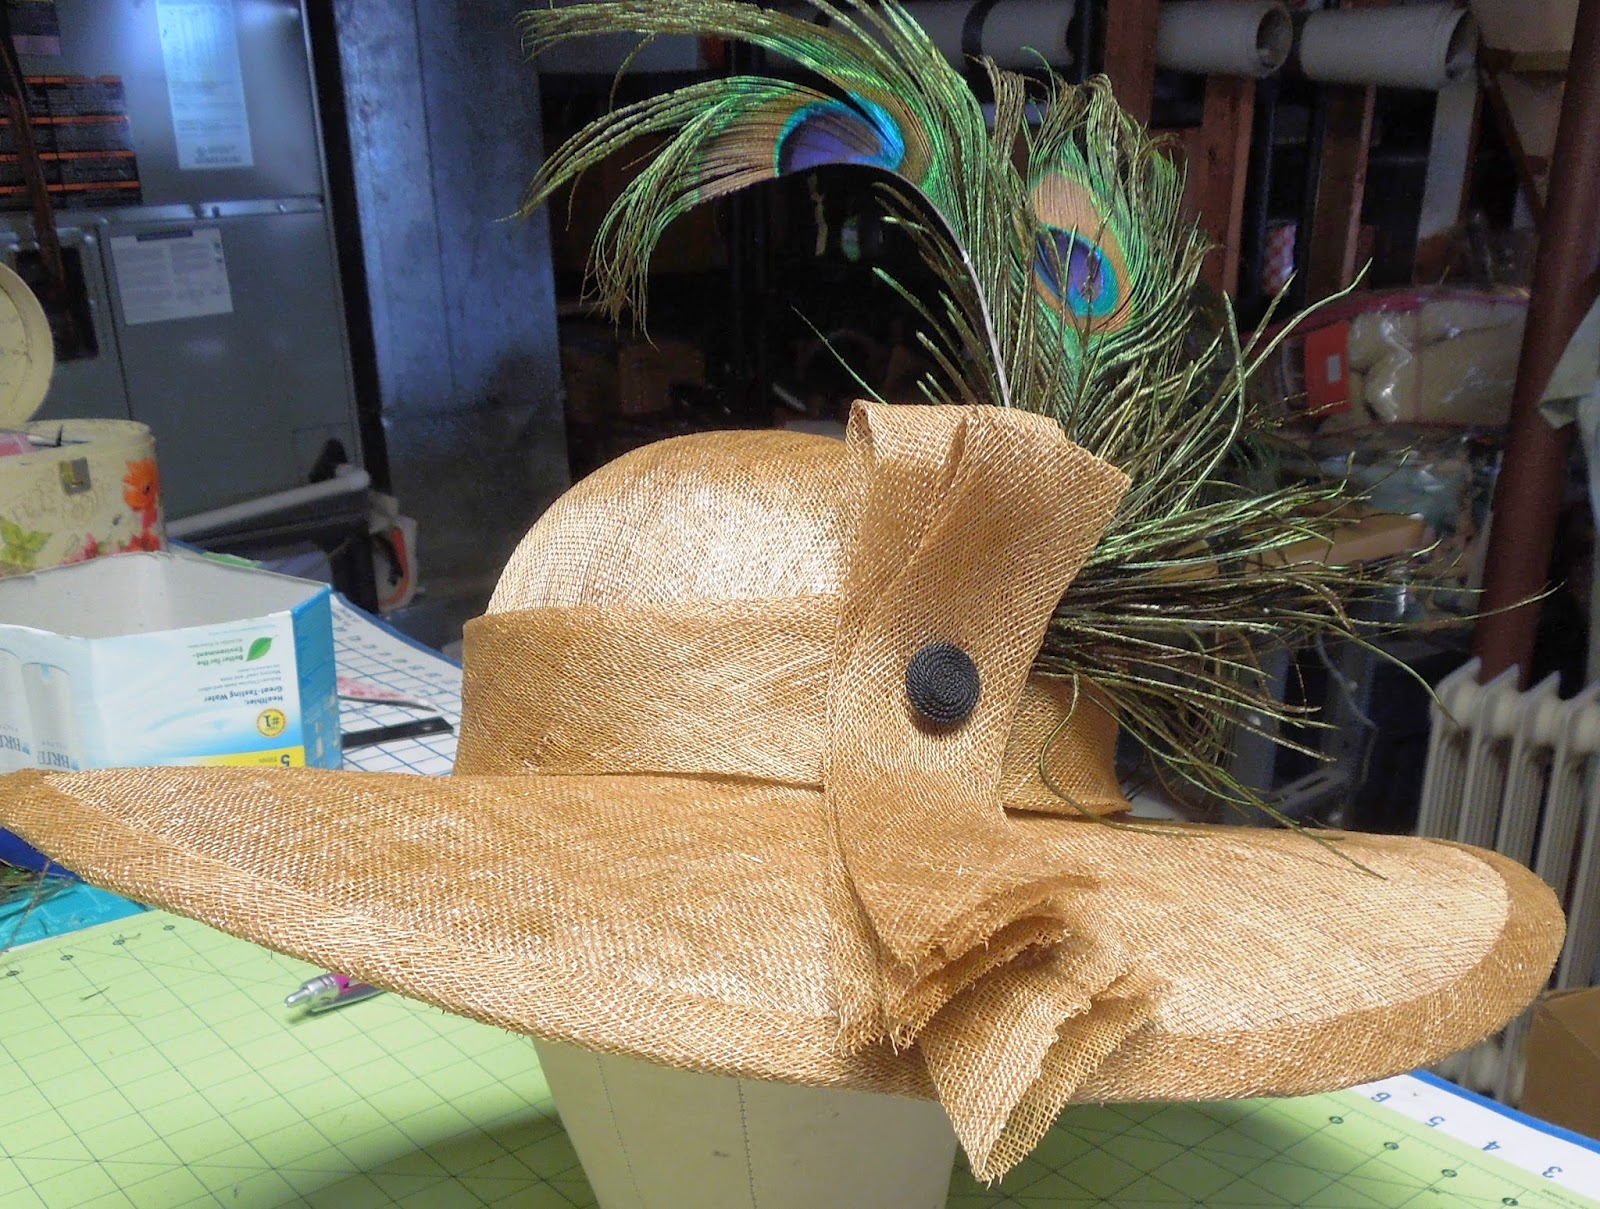 |
| finished hat with decor that is detachable for travel |
Friday, February 28, 2014
Sweatshirt makeover revealed
I wanted to makeover a sweatshirt so I could tie into the trend of upscale sweatshirt tops. I embroidered on mine and replaced the sleeves with a sheer material. I then styled it with some elements I already had in my wardrobe: skinny leggins, motor-cross booties, a 3/4 length coat, and silk chiffon black/white scarf. Hope you like the effect.


Subscribe to:
Posts (Atom)